

Certainly! Here’s a set of interview questions and answers tailored for a developer role focusing on ASP.NET, C#, and Angular
1. Can you explain the key differences between ASP.NET MVC and ASP.NET Core?
Answer: ASP.NET MVC and ASP.NET Core are both frameworks for building web applications, but they have some key differences:
- Platform Support: ASP.NET MVC is part of the .NET Framework and is primarily designed for Windows-based applications. ASP.NET Core is cross-platform, meaning it can run on Windows, Linux, and macOS.
- Modularity: ASP.NET Core is more modular compared to ASP.NET MVC. It has a more lightweight, flexible framework with built-in dependency injection, and developers can include only the components they need.
- Performance: ASP.NET Core has been designed with performance in mind and generally offers better performance than ASP.NET MVC due to its optimizations and improvements.
- Hosting: ASP.NET Core applications can be hosted on IIS, Kestrel, or self-hosted, providing greater flexibility. ASP.NET MVC applications are primarily hosted on IIS.
- Configuration: ASP.NET Core uses a more modern configuration system, including JSON-based configuration files and environment-specific settings, whereas ASP.NET MVC traditionally uses XML-based
web.configfiles.
2. How does dependency injection work in ASP.NET Core?
Answer: Dependency Injection (DI) is a design pattern used to implement Inversion of Control (IoC), allowing objects to be injected into a class rather than the class creating the objects. ASP.NET Core has built-in support for DI, which simplifies and standardizes the process.
- Registration: Services are registered in the
ConfigureServicesmethod ofStartup.cs. You can register services with different lifetimes (Transient, Scoped, Singleton).csharpCopy codepublic void ConfigureServices(IServiceCollection services) { services.AddTransient<IMyService, MyService>(); services.AddScoped<IOtherService, OtherService>(); services.AddSingleton<ISingletonService, SingletonService>(); } - Injection: Services are injected into controllers, middlewares, or other classes via constructor injection.csharpCopy code
public class MyController : Controller { private readonly IMyService _myService; public MyController(IMyService myService) { _myService = myService; } public IActionResult Index() { // Use _myService } } - Lifetime Management:
- Transient: Created each time they are requested.
- Scoped: Created once per request.
- Singleton: Created once and shared throughout the application’s lifetime.
3. What are some key features of Angular that make it suitable for building single-page applications (SPAs)?
Answer: Angular offers several features that make it a powerful framework for building SPAs:
- Two-Way Data Binding: Angular’s two-way data binding ensures that changes in the UI automatically update the underlying data model and vice versa, streamlining the development of dynamic UIs.
- Component-Based Architecture: Angular’s component-based architecture helps in building modular, reusable UI components that can be easily managed and tested.
- Routing: Angular’s built-in routing module allows developers to create a SPA with multiple views and navigation without requiring a full-page reload.
- Dependency Injection: Angular’s DI system simplifies the management of dependencies and promotes code modularity and testability.
- RxJS: Angular uses RxJS for reactive programming, enabling developers to work with asynchronous data streams effectively.
- Angular CLI: The Angular Command Line Interface (CLI) provides tools for generating components, services, and other elements, as well as for managing the build process.
4. How do you handle error handling in an Angular application?
Answer: Error handling in Angular involves several strategies:
- Component-Level Error Handling: Use
try-catchblocks within component methods to catch and handle errors that occur during the execution of functions.typescriptCopy codesomeMethod() { try { // Code that might throw an error } catch (error) { // Handle error } } - Service-Level Error Handling: In Angular services, you can use RxJS operators such as
catchErrorto handle errors from HTTP requests.typescriptCopy codeimport { catchError } from 'rxjs/operators'; import { throwError } from 'rxjs'; getData() { return this.http.get('api/data').pipe( catchError(error => { console.error('Error occurred:', error); return throwError(error); }) ); } - Global Error Handling: Implement an
ErrorHandlerclass to handle errors globally across the application.typescriptCopy codeimport { ErrorHandler } from '@angular/core'; export class GlobalErrorHandler implements ErrorHandler { handleError(error: any): void { console.error('Global error occurred:', error); // Log error to an external server or service } }Register the global error handler inAppModule:typescriptCopy codeimport { NgModule } from '@angular/core'; @NgModule({ providers: [{ provide: ErrorHandler, useClass: GlobalErrorHandler }] }) export class AppModule {}
5. What is the purpose of ngOnInit in Angular?
Answer: ngOnInit is a lifecycle hook in Angular that is called after Angular has initialized all data-bound properties of a directive or component. It is used for component initialization and is a good place to perform setup tasks such as fetching data, initializing properties, or setting up subscriptions.
typescriptCopy codeimport { Component, OnInit } from '@angular/core';

@Component({
  selector: 'app-example',
  templateUrl: './example.component.html'
})
export class ExampleComponent implements OnInit {
  data: any;

  constructor(private dataService: DataService) {}

  ngOnInit(): void {
      this.dataService.getData().subscribe(result => {
          this.data = result;
      });
  }
}
6. How do you implement form validation in Angular?
Answer: Angular provides robust support for form validation through both template-driven and reactive forms:
- Template-Driven Forms: Use Angular’s built-in validators within template-driven forms by adding validation attributes to form controls.htmlCopy code
<form #form="ngForm"> <input name="username" ngModel required minlength="4"> <div *ngIf="form.submitted && form.controls.username.errors?.required"> Username is required. </div> <button type="submit">Submit</button> </form> - Reactive Forms: Use
FormGroup,FormControl, andValidatorsfrom@angular/formsto build and manage forms programmatically.typescriptCopy codeimport { FormBuilder, FormGroup, Validators } from '@angular/forms'; export class MyComponent implements OnInit { myForm: FormGroup; constructor(private fb: FormBuilder) {} ngOnInit(): void { this.myForm = this.fb.group({ username: ['', [Validators.required, Validators.minLength(4)]] }); } onSubmit(): void { if (this.myForm.valid) { // Handle form submission } } }
7. How would you handle asynchronous operations in Angular?
Answer: Asynchronous operations in Angular are typically handled using RxJS observables. Here’s how you can manage asynchronous tasks:
- HTTP Requests: Use Angular’s
HttpClientto perform asynchronous HTTP operations.typescriptCopy codeimport { HttpClient } from '@angular/common/http'; import { Observable } from 'rxjs'; export class DataService { constructor(private http: HttpClient) {} getData(): Observable<Data> { return this.http.get<Data>('api/data'); } } - Subscriptions: Subscribe to observables to handle the response and manage asynchronous data.typescriptCopy code
import { Component, OnInit } from '@angular/core'; import { DataService } from './data.service'; @Component({ selector: 'app-data', templateUrl: './data.component.html' }) export class DataComponent implements OnInit { data: any; constructor(private dataService: DataService) {} ngOnInit(): void { this.dataService.getData().subscribe(result => { this.data = result; }); } } - Async Pipe: Use Angular’s
asyncpipe in templates to automatically subscribe to observables and manage the subscription lifecycle.htmlCopy code<div *ngIf="dataService.getData() | async as data"> {{ data | json }} </div>
These questions and answers cover a range of important topics for a developer working with ASP.NET, C#, and Angular, and they should help in preparing for interviews or deepening your understanding of these technologies.

Navigating the Top Challenges Every Developer Faces in 2024
In the ever-evolving world of software development, staying ahead of the curve can feel like a constant race. As we move through 2024, developers are encountering a set of common challenges that test their skills and adaptability. Whether you’re a seasoned professional or a newcomer to the field, understanding these issues can help you navigate the complexities of modern development and find effective solutions. Here’s a look at some of the most pressing problems developers face today:
1. Keeping Up with Rapid Technological Change
The pace of technological advancement continues to accelerate, with new frameworks, tools, and languages emerging regularly. For developers, this means a continuous need to learn and adapt. Staying updated with the latest trends and technologies, while also maintaining expertise in existing tools, can be overwhelming.
Solution: Prioritize continuous learning through online courses, webinars, and tech meetups. Create a structured learning plan that allows you to focus on new technologies that align with your career goals or current projects.

2. Managing Technical Debt
Technical debt accumulates when shortcuts are taken in code development, often to meet deadlines. This can lead to messy, unmaintainable code that’s difficult to refactor or update. As systems grow, so does the debt, making it harder to manage over time.
Solution: Implement regular code reviews and refactoring sessions as part of your development cycle. Adopt best practices for coding and documentation to minimize the accumulation of technical debt from the start.
3. Ensuring Security and Privacy
With cyber threats becoming more sophisticated, securing applications and protecting user data is a growing concern. Developers must integrate robust security measures into their code while also staying compliant with evolving privacy regulations.
Solution: Embrace a security-first mindset by incorporating security best practices into your development process. Use tools for vulnerability scanning and encryption, and stay informed about the latest security threats and compliance requirements.
4. Balancing Speed and Quality
The pressure to deliver features quickly can sometimes compromise the quality of the code. Striking the right balance between rapid development and maintaining high standards of code quality is a challenge many developers face.
Solution: Adopt agile methodologies that emphasize iterative development and continuous testing. Implement automated testing and continuous integration/continuous deployment (CI/CD) pipelines to ensure quality without sacrificing speed.
5. Handling Complex Legacy Systems
Legacy systems can pose significant challenges due to their outdated technology and architecture. Integrating new features or modernizing these systems often requires considerable effort and expertise.
Solution: Approach legacy system modernization with a strategic plan. Assess the current system’s strengths and weaknesses, and consider incremental updates or replacements to minimize disruption while achieving modernization goals.
6. Collaboration and Communication
In today’s remote and distributed work environments, effective collaboration and communication among team members can be challenging. Misunderstandings and lack of coordination can slow down development and impact project outcomes.
Solution: Leverage collaboration tools like Slack, Microsoft Teams, or Asana to facilitate communication. Establish clear protocols for documentation, updates, and feedback to ensure everyone is on the same page.
7. Managing Project Requirements
Requirements often change mid-project due to evolving business needs or unforeseen challenges. Managing these changes while keeping the project on track and within budget is a common issue.
Solution: Implement agile methodologies that allow for flexibility and iterative changes. Maintain open lines of communication with stakeholders to ensure that any changes in requirements are addressed promptly and effectively.
8. Optimizing Performance
As applications become more complex, optimizing performance to ensure fast load times and a smooth user experience becomes increasingly challenging. Performance issues can lead to user dissatisfaction and higher bounce rates.
Solution: Regularly profile and monitor application performance. Use performance optimization techniques such as caching, code minification, and load balancing to address and resolve performance bottlenecks.
Conclusion
Navigating the challenges of modern development requires a blend of technical expertise, strategic planning, and effective communication. By understanding and addressing these common issues, developers can not only enhance their productivity but also contribute to building more robust and innovative software solutions. As the field of software development continues to evolve, staying adaptable and proactive will be key to overcoming these challenges and achieving success in your projects.

Leading Digital Marketing Company in Bhopal: KRP Digital
Are you looking to elevate your brand’s online presence and drive results? Look no further than KRP Digital, the premier digital marketing company in Bhopal, Madhya Pradesh. We are committed to helping businesses achieve their marketing goals with innovative strategies and data-driven solutions.
About KRP Digital
At KRP Digital, we understand that the digital landscape is constantly evolving, and so should your marketing strategies. Based in the heart of Bhopal, Madhya Pradesh, our team of experts is dedicated to providing comprehensive digital marketing services tailored to your unique business needs.
Contact Us Today:
- Phone: +91 8871672202
- Address: First Floor, Amer Complex, Zone-II, MP Nagar, Bhopal, MP 462011
Our Services
1. Search Engine Optimization (SEO) Improve your website’s visibility and ranking on search engines with our expert SEO services. We use proven techniques to help you reach your target audience and drive organic traffic to your site.
2. Pay-Per-Click Advertising (PPC) Maximize your ROI with targeted PPC campaigns. Our team will design and manage ads that capture attention and drive conversions, ensuring your marketing budget is used effectively.
3. Social Media Marketing Engage with your audience on popular social platforms. We create compelling social media strategies that enhance your brand’s presence and foster meaningful interactions with your customers.
4. Content Marketing Build trust and authority with high-quality content. From blog posts to infographics, we craft content that resonates with your audience and supports your overall marketing goals.
5. Web Design and Development Ensure your website is not only visually appealing but also functional and user-friendly. Our web design and development services focus on creating an exceptional online experience for your visitors.
Why Choose KRP Digital?
- Local Expertise: As a Bhopal-based company, we have a deep understanding of the local market and can tailor strategies to fit your specific needs.
- Results-Driven: Our approach is focused on delivering measurable results. We track performance, analyze data, and adjust strategies to ensure your marketing efforts are effective.
- Customer-Centric: We prioritize your business goals and work closely with you to develop and execute strategies that drive success.
Get in Touch
Ready to take your digital marketing to the next level? Contact KRP Digital today and let us help you achieve your online marketing objectives.
Phone: +91 8871672202
Address: First Floor, Amer Complex, Zone-II, MP Nagar, Bhopal, MP 462011

Mastering Date Handling in C#: Parsing and Formatting DateTime Strings
Introduction
Date and time handling is a fundamental aspect of many software applications, ranging from simple time tracking to complex event scheduling systems. In C#, the DateTime structure provides a wide array of methods for handling dates and times. However, the real challenge often lies in parsing and formatting dates, especially when dealing with various custom formats. In this blog, we’ll delve into practical techniques for managing date and time data in C#, focusing on parsing custom date formats like ddMMyyyyhhmmss.
Why Date Parsing Matters
Parsing dates correctly is crucial for data integrity and user experience. A common issue developers face is ensuring that date strings are correctly converted into DateTime objects, especially when these strings come from user input or external systems with varying formats.
Example: Parsing Custom Date Format ddMMyyyyhhmmss
Consider an application that receives timestamps in the format ddMMyyyyhhmmss. To convert these strings into DateTime objects in C#, we can use the DateTime.ParseExact method, which allows specifying the exact format of the input string. This ensures that the date and time components are accurately parsed.
Here’s a sample code snippet that demonstrates this:
csharpCopy codeusing System;class Program
{
static void Main()
{
// Example input string in the format ddMMyyyyhhmmss
string dateTimeStr = "29072024091530"; // Represents 29th July 2024, 09:15:30 AM
// Specify the exact format of the input string
string format = "ddMMyyyyHHmmss";
// Parse the string into a DateTime object
DateTime dateTime;
if (DateTime.TryParseExact(dateTimeStr, format, null, System.Globalization.DateTimeStyles.None, out dateTime))
{
Console.WriteLine("Parsed DateTime: " + dateTime);
}
else
{
Console.WriteLine("Invalid date/time format.");
}
}
}
Key Points:
- Format Specification: The format string
ddMMyyyyHHmmssclearly defines how each part of the date and time is expected to appear in the input string. - 24-Hour Clock: The
HHcomponent ensures that the hours are read in a 24-hour format, which is crucial for avoiding AM/PM confusion. - Error Handling: Using
DateTime.TryParseExactprovides a safe way to attempt parsing and handle any potential errors gracefully.
Common Pitfalls
- Culture Differences: Date and time formats can vary significantly across cultures. Always ensure that your parsing logic accounts for these differences, especially if your application is intended for international use.
- Time Zone Considerations: When dealing with
DateTime, consider whether time zone information is necessary for your application. If so, you might need to useDateTimeOffsetinstead.
Conclusion
Mastering date and time handling in C# requires an understanding of both the DateTime structure and the specific formatting requirements of your application. By using methods like DateTime.ParseExact, developers can ensure accurate parsing and formatting, thereby maintaining data integrity and enhancing user experience. Remember to handle errors gracefully and consider cultural and time zone differences in your implementations.
Boosting Sales on E-commerce Platforms: Proven Strategies and Tips
In the digital age, e-commerce has become a vital channel for businesses to reach customers globally. However, with increasing competition, merely having an online presence is not enough. To succeed, businesses need to implement effective strategies that not only attract but also convert visitors into loyal customers. Here are some proven strategies to boost sales on your e-commerce platform:
1. Optimize Product Listings
- High-Quality Images: Use clear, high-resolution images that showcase the product from different angles. Include zoom-in features for detailed views.
- Compelling Descriptions: Write detailed and persuasive product descriptions. Highlight unique features, benefits, and specifications. Use bullet points for easy readability.
- SEO-Friendly Content: Incorporate relevant keywords naturally into product titles and descriptions to improve visibility on search engines.
2. Leverage Social Media Marketing
- Engage with Customers: Use social media platforms to interact with customers, answer questions, and gather feedback. This builds trust and a community around your brand.
- Promote Products: Regularly share engaging content, including product launches, promotions, and user-generated content. Utilize social media ads for targeted marketing.
3. Offer Promotions and Discounts
- Limited-Time Offers: Create a sense of urgency with flash sales, limited-time discounts, or exclusive deals. This encourages quick purchases.
- Bundle Offers: Offer discounts on product bundles or complementary items to increase the average order value.
4. Enhance User Experience
- Easy Navigation: Ensure your website is easy to navigate with a user-friendly layout. Include a search bar, filters, and categories for easier product discovery.
- Mobile Optimization: With a significant number of shoppers using mobile devices, ensure your website is mobile-friendly, with fast load times and responsive design.
5. Utilize Customer Reviews and Testimonials
- Encourage Reviews: Positive reviews can significantly influence purchasing decisions. Encourage satisfied customers to leave reviews and showcase them prominently on product pages.
- Respond to Feedback: Address negative reviews professionally and offer solutions. This shows potential customers that you value their satisfaction.
6. Implement Email Marketing Campaigns
- Personalized Emails: Use customer data to send personalized emails, including product recommendations, special offers, and cart abandonment reminders.
- Loyalty Programs: Reward repeat customers with loyalty programs or special discounts, encouraging them to make more purchases.
7. Improve Customer Service
- Live Chat Support: Offer live chat support to assist customers in real-time. Quick responses can help close sales and improve customer satisfaction.
- Clear Return Policies: Clearly outline return policies to build trust and make customers feel secure in their purchase decisions.
Conclusion
Boosting sales on e-commerce platforms requires a comprehensive approach that combines marketing, customer engagement, and operational excellence. By implementing these strategies, businesses can enhance their online presence, attract more customers, and increase their sales. Remember, the key to success lies in continuously adapting to market trends and customer preferences.

Integrating AI with Excel: Transforming Data Analysis and Automation
Introduction
In today’s data-driven world, businesses and individuals rely heavily on tools like Microsoft Excel for data analysis and decision-making. However, with the advent of artificial intelligence (AI), the capabilities of Excel have expanded significantly. Integrating AI with Excel allows users to automate repetitive tasks, analyze complex data, and gain deeper insights. In this blog, we explore how AI integration with Excel is transforming data analysis and automation, offering practical tips and insights for leveraging these powerful technologies.
The Power of AI in Excel
AI in Excel is not just about adding advanced features; it’s about enhancing the way we work with data. By integrating AI, users can automate data cleaning, perform predictive analytics, and even generate insights automatically. Here are some key areas where AI can be applied:
- Data Cleaning and Preparation: AI algorithms can automate data cleaning processes, identifying and correcting errors, filling in missing values, and normalizing data formats. This not only saves time but also ensures data quality and consistency.
- Predictive Analytics: AI can analyze historical data to make predictions about future trends and outcomes. Excel users can leverage machine learning models to forecast sales, predict customer behavior, and identify potential risks.
- Natural Language Processing (NLP): With NLP capabilities, Excel can interpret and process human language, enabling users to query data in natural language and receive responses in plain English. This makes data analysis more accessible to non-technical users.
- Automated Insights: AI-driven tools can automatically generate insights from data, highlighting key trends, anomalies, and correlations. This helps users quickly understand the implications of their data without extensive manual analysis.

Tools and Techniques for AI Integration in Excel
- Excel Add-ins and Extensions: Several AI-powered add-ins and extensions are available for Excel, such as Microsoft’s AI Builder, which integrates machine learning models directly into Excel sheets. These tools simplify the process of incorporating AI functionalities without the need for extensive coding.
- Power Query and Power Pivot: These Excel features allow users to connect to various data sources, perform complex transformations, and create sophisticated data models. Combined with AI, they enable advanced analytics and automation.
- Python and R Integration: For more advanced users, Excel can integrate with Python and R, popular languages for data science and machine learning. This allows for the execution of complex algorithms and scripts directly within Excel.
- Cloud-Based AI Services: Leveraging cloud-based AI services, such as Microsoft Azure’s Cognitive Services, can further extend Excel’s capabilities. These services offer pre-built models for tasks like image recognition, text analysis, and sentiment analysis.
Best Practices for Implementing AI in Excel
- Start Small and Scale: Begin with simple AI integrations, such as automated data cleaning or basic predictive models. As you become more comfortable, scale up to more complex applications.
- Focus on Data Quality: Ensure that your data is clean, accurate, and well-organized before applying AI techniques. Poor data quality can lead to inaccurate predictions and insights.
- Educate Users: Provide training and resources to help users understand how to leverage AI tools effectively. This includes understanding the limitations and potential biases in AI models.
- Monitor and Update: Regularly monitor the performance of AI models and update them as needed. AI models can degrade over time as data patterns change.
Conclusion
Integrating AI with Excel opens up a world of possibilities for data analysis and automation. From streamlining workflows to uncovering hidden insights, AI empowers users to work more efficiently and make better-informed decisions. By leveraging AI tools and techniques, businesses and individuals can transform their use of Excel, turning it into a powerful platform for innovation and growth.
Connecting All Solutions in Onion Architecture with ASP.NET C#
Introduction
In modern software development, maintaining a clean separation of concerns and promoting modularity are crucial for building scalable and maintainable applications. The Onion Architecture, also known as the Clean Architecture or Hexagonal Architecture, is a design pattern that helps achieve these goals. In this blog, we’ll explore how to connect various solutions within an Onion Architecture using ASP.NET C#, ensuring that your applications are robust and easy to manage.
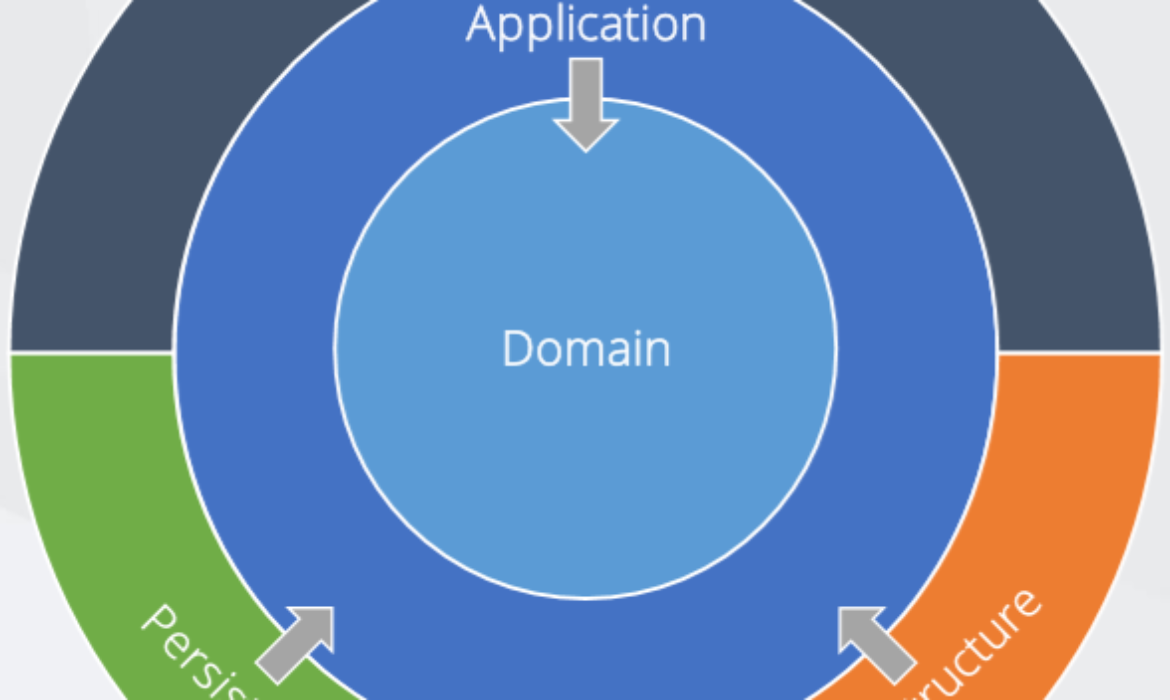
Understanding Onion Architecture
Onion Architecture revolves around the concept of layers, with the core business logic at the center and external dependencies on the outer layers. This structure facilitates a clear separation of concerns, making the system more modular and testable. The key layers typically include:
- Core Layer: Contains the domain entities and interfaces for repositories, services, and other abstractions.
- Application Layer: Implements business use cases and orchestrates the application’s operations.
- Infrastructure Layer: Deals with external concerns like databases, file systems, APIs, and UI.
- Presentation Layer: Handles the user interface and client-side interactions.

Connecting the Layers
To connect the layers in Onion Architecture, it’s essential to follow these principles:
- Dependency Inversion: High-level modules should not depend on low-level modules. Both should depend on abstractions.
- Inversion of Control (IoC): Use dependency injection to manage dependencies, promoting decoupling and flexibility.
Practical Steps to Integrate Solutions
- Define Interfaces in the Core Layer:
- Begin by defining interfaces for repositories, services, and other components in the core layer. These interfaces represent contracts that other layers must adhere to.
- Implement Services in the Application Layer:
- In the application layer, implement the business logic using the interfaces defined in the core layer. This layer should focus on orchestrating operations without worrying about the underlying infrastructure.
- Infrastructure Implementation:
- Implement the interfaces in the infrastructure layer. This includes database repositories, external service calls, and other infrastructure-specific logic. By adhering to the contracts defined in the core layer, the infrastructure layer remains loosely coupled with the rest of the application.
- Dependency Injection in ASP.NET:
- Use ASP.NET’s built-in dependency injection (DI) container to manage dependencies. Register your services, repositories, and other components with the DI container during application startup. This practice ensures that dependencies are resolved at runtime, promoting flexibility and ease of testing.
- UI and Presentation Layer:
- The presentation layer interacts with the application layer to perform user operations. This layer should be independent of the business logic, focusing solely on user interactions and UI rendering.
Best Practices
- Maintain Loose Coupling: Ensure that each layer only interacts with adjacent layers through interfaces. This approach reduces the impact of changes and enhances maintainability.
- Use DTOs for Data Transfer: Employ Data Transfer Objects (DTOs) to pass data between layers, preventing domain entities from being exposed to the presentation layer.
- Modularize Your Codebase: Keep the codebase organized by creating separate projects for each layer, promoting modularity and clean architecture.
Conclusion
Onion Architecture offers a robust framework for building scalable and maintainable applications in ASP.NET C#. By following its principles and practices, you can ensure a clean separation of concerns, modular design, and seamless integration of different solutions. Whether you’re developing new applications or refactoring existing ones, this architecture can help you achieve a more structured and efficient codebase.

The Power of PowerShell in Windows: Unlocking Advanced Capabilities
The Power of PowerShell in Windows: Unlocking Advanced Capabilities
In the realm of Windows operating systems, PowerShell stands out as a robust and versatile tool that has revolutionized the way users interact with their systems. This blog explores the myriad uses of PowerShell, highlighting its significance in enhancing productivity and streamlining various administrative tasks.
What is PowerShell?
PowerShell is a task automation and configuration management framework from Microsoft, consisting of a command-line shell and an associated scripting language. Initially released in 2006, PowerShell has evolved significantly, offering a wide range of features designed to automate repetitive tasks, manage system configurations, and facilitate complex administrative functions.
Key Features of PowerShell
- Command-Line Interface (CLI): PowerShell provides a powerful CLI that allows users to perform tasks efficiently using simple command prompts. This interface is especially useful for advanced users who prefer direct control over their system’s functionalities.
- Scripting Language: PowerShell’s scripting language enables users to write scripts that automate complex tasks. These scripts can be used to manage system configurations, deploy applications, and perform various administrative duties, making it a vital tool for IT professionals.
- Object-Oriented Approach: Unlike traditional command-line interfaces, PowerShell is built on the .NET framework, allowing it to leverage object-oriented capabilities. This means that data output from one command can be directly passed as input to another, streamlining workflows and reducing the need for intermediate processing.
- Extensive Module Support: PowerShell supports a wide range of modules, extending its capabilities to various Microsoft and third-party applications. This extensibility ensures that users can manage diverse environments and applications from a single platform.
- Remote Management: One of PowerShell’s standout features is its ability to perform remote management tasks. This capability allows administrators to manage multiple systems across a network from a single console, significantly enhancing efficiency.
Benefits of Using PowerShell
- Automation of Repetitive Tasks: PowerShell excels at automating repetitive tasks, freeing up valuable time for IT professionals to focus on more strategic initiatives. Scripts can be created to perform regular maintenance, deploy updates, and manage configurations with minimal manual intervention.
- Improved System Management: With PowerShell, system management becomes more streamlined and consistent. Administrators can use scripts to ensure that systems are configured uniformly, reducing the risk of human error and enhancing overall system reliability.
- Enhanced Productivity: The ability to script complex tasks and automate workflows translates to increased productivity. PowerShell scripts can perform tasks in seconds that might take hours if done manually, enabling faster response times and more efficient operations.
- Flexibility and Control: PowerShell provides unparalleled flexibility and control over the Windows environment. Users can customize scripts to meet their specific needs, tailoring solutions to address unique challenges and requirements.
- Integration with Other Tools: PowerShell integrates seamlessly with other Microsoft tools and services, such as Azure, Microsoft 365, and System Center. This integration ensures a cohesive and unified approach to system management and automation.
Practical Applications of PowerShell
- System Monitoring and Reporting: PowerShell scripts can be used to monitor system performance, generate reports, and alert administrators to potential issues. This proactive approach helps in maintaining optimal system health and preventing downtime.
- User and Group Management: PowerShell simplifies user and group management tasks, such as creating and deleting accounts, assigning permissions, and managing group memberships. These tasks can be automated to ensure consistency and accuracy.
- Software Deployment: Deploying software across multiple systems can be a daunting task. PowerShell scripts can automate the deployment process, ensuring that applications are installed correctly and consistently across all target machines.
- Backup and Recovery: PowerShell can be used to automate backup and recovery processes, safeguarding critical data and ensuring quick recovery in the event of data loss.
- Configuration Management: PowerShell Desired State Configuration (DSC) is a powerful feature that allows administrators to define and manage system configurations declaratively. DSC ensures that systems remain in a desired state, automatically correcting any deviations.
Conclusion
PowerShell is an indispensable tool for anyone working within the Windows ecosystem. Its powerful scripting capabilities, combined with its object-oriented approach and extensive module support, make it a vital asset for system administrators and IT professionals. By automating repetitive tasks, enhancing system management, and improving productivity, PowerShell unlocks advanced capabilities that transform the way users interact with their Windows systems.

How to Earn Money from Blogging and AdSense
Introduction
Blogging has become a popular way for people to share their passions, insights, and stories with the world. But did you know that you can also turn your blog into a profitable venture? With Google AdSense, bloggers can earn money by displaying ads on their websites. In this blog post, we’ll explore how you can start earning money from your blog using AdSense.
Step 1: Start a Blog
The first step to earning money through blogging is to create a blog. Choose a niche that you are passionate about and that has the potential to attract a large audience. Popular niches include technology, travel, food, fashion, health, and personal finance.
Step 2: Create Quality Content
Content is king in the blogging world. To attract readers and keep them coming back, you need to produce high-quality, engaging, and informative content. Your content should be well-researched, well-written, and provide value to your audience.
Step 3: Drive Traffic to Your Blog
Once you have quality content, the next step is to drive traffic to your blog. Here are some strategies to increase your blog’s visibility:
- SEO Optimization: Optimize your blog posts for search engines by using relevant keywords, meta descriptions, and alt tags.
- Social Media: Promote your blog on social media platforms like Facebook, Twitter, Instagram, and LinkedIn. Join groups and communities related to your niche to share your content.
- Guest Blogging: Write guest posts for other blogs in your niche to gain exposure and drive traffic back to your blog.
- Email Marketing: Build an email list and send regular newsletters to your subscribers with links to your latest blog posts.
Step 4: Sign Up for Google AdSense
Google AdSense is a free program that allows bloggers to earn money by displaying targeted ads on their blogs. To sign up for AdSense, follow these steps:
- Visit the Google AdSense website.
- Click on “Get Started” and sign in with your Google account.
- Enter your blog URL and complete the application process.
- Once your application is approved, you will receive a code to insert into your blog’s HTML. This code will display ads on your blog.
Step 5: Optimize Your Ad Placements
To maximize your earnings, it’s important to strategically place ads on your blog. Here are some tips:
- Above the Fold: Place ads where they are visible without scrolling.
- Within Content: Embed ads within your blog posts to capture readers’ attention as they read.
- Sidebar: Utilize your blog’s sidebar for ad placements.
- Responsive Ads: Use responsive ad units that automatically adjust to different screen sizes.
Step 6: Monitor and Improve
Regularly monitor your AdSense performance using the Google AdSense dashboard. Pay attention to metrics like click-through rates (CTR), cost per click (CPC), and overall earnings. Use this data to optimize your ad placements and content strategy.
Conclusion
Earning money from blogging with Google AdSense is a realistic goal for anyone willing to put in the effort. By creating high-quality content, driving traffic to your blog, and strategically placing ads, you can turn your blogging passion into a profitable endeavor. Start your blogging journey today and watch your income grow.
Connect with Us
Stay updated with the latest blogging tips and strategies by following our Facebook page. Join our community of bloggers and start your journey to financial freedom through blogging!

How to Create a Website on WordPress and Earn Money with AdSense
Creating a website on WordPress and earning money through Google AdSense is a great way to generate passive income. Whether you’re a blogger, a business owner, or just looking to share your passion with the world, this guide will help you get started.
Step 1: Setting Up Your WordPress Website
- Choose a Domain Name and Hosting
- Your domain name is your website’s address on the internet, like www.yourwebsite.com. Choose something memorable and relevant to your content.
- Hosting is where your website lives on the internet. For beginners, shared hosting is a good start. Popular providers include Bluehost, SiteGround, and HostGator.
- Install WordPress
- Most hosting providers offer one-click WordPress installation. Follow the instructions provided by your host to set up WordPress.
- Select a Theme
- WordPress offers a variety of free and premium themes. Choose one that suits your niche and is responsive (mobile-friendly).
- Customize Your Website
- Go to
Appearance > Customizein your WordPress dashboard to make changes to your site’s design. - Add essential pages like About, Contact, and Privacy Policy.
- Go to
Step 2: Creating Quality Content
- Identify Your Niche
- Choose a niche that you are passionate about and that has an audience. Popular niches include health, finance, travel, and technology.
- Write High-Quality Posts
- Aim for informative, engaging, and original content. Consistently posting quality articles will help attract and retain visitors.
- Use Keywords
- Incorporate relevant keywords naturally into your content to improve your site’s SEO. Tools like Google Keyword Planner and SEMrush can help you find the right keywords.
Step 3: Applying for Google AdSense
- Sign Up for AdSense
- Visit the Google AdSense website and sign up for an account. Provide all necessary information and link your WordPress site.
- Place Ad Units
- Once your account is approved, you can start placing ad units on your site. Google AdSense provides code that you can insert into your WordPress site’s widgets or directly into posts.
- Ad Placement
- Place ads in high-visibility areas such as the header, sidebar, and within content. However, avoid overwhelming your readers with too many ads.
Step 4: Optimizing for Ad Revenue
- Increase Traffic
- Promote your site on social media, participate in forums, and use email marketing to drive traffic to your website.
- Optimize Ad Placement
- Experiment with different ad placements to see which ones generate the most clicks. Use Google Analytics to track performance.
- Responsive Ads
- Ensure your ads are mobile-friendly. Google AdSense offers responsive ad units that automatically adjust to different screen sizes.
Step 5: Complying with AdSense Policies
- Read and Follow AdSense Policies
- Google AdSense has strict policies regarding content and ad placement. Ensure you comply to avoid account suspension.
- Regularly Update Content
- Keep your site active by regularly posting new content. This not only attracts visitors but also keeps you in good standing with AdSense.
Conclusion
Creating a website on WordPress and monetizing it with Google AdSense can be a profitable venture if done correctly. By following these steps, you can build a successful website that generates steady ad revenue. Remember, consistency and quality are key to attracting and maintaining an audience.

